Every January I run tours to northern Norway in the hope of seeing the Northern Lights. Over the years I have been incredibly lucky and to date, every single tour I have run has seen the Northern lights. I’ve taken all sorts of cameras on these tours, everything from optical disc camcorders (PDW-700), solid state camcorders including the original Sony EX1 and most of Sony’s large sensor video cameras from FS100 to the FX9.
All of these cameras are fairly bulky and require larger tripods and battery systems. In addition, I have always taken a stills camera to shoot timelapse of the Aurora. This year I decided to downsize the equipment I was taking, so instead of taking a full-size video camera I decided to take 2 small cameras.
I already have an FX3, which is a great camera and extremely good in low light. Being part of the Sony Cinema line, it has Sony’s very nice looking Venice based colour science as well, can shoot using S-Log3 as well as the handy what you see is what you get S-Cinetone gamma curve. I know this camera well and I knew it would be a good choice for the challenges I would encounter in Norway. To compliment the FX3 I also decided to take a Sony A1. The A1 (or Alpha 1) is Sony’s flagship compact mirrorless stills camera. As well as amazing photo performance the A1 also promises much as a video camera. It’s 50.1 megapixel sensor allows it to shoot high quality video at 8K. Like the FX3 the A1 can record using S-Log3 and offers similar dynamic range to the FX3.
Sony Alpha A1
Need for Speed – fast lenses.
For many years my main lens for shooting the Northern Lights has been the Sigma 20mm f1.4. This is a great lens, but it is quite heavy and I’ve never found the autofocus on this lens to be all that good. I already have Sony’s 20mm f1.8 and this is a great lens for the money. But for the Northern Lights you really want your lenses to be as fast as possible.So for this trip I decided to take Sony’s 24mm f1.4 GM lens to see how that performed.
Sony 24mm f1.4 G Master lens – I really like this lens.
The other lens that I use extensively on trips like this is the much-underrated Sony 24-240mm zoom lens. This is a 10x zoom giving a huge range of focal lengths from pretty wide to nice and long. The aperture does ramp, going from f3.5 to f6.3 as you zoom in. But for the kinds of shoots I use this lens on this is rarely an issue. Todays cameras are so sensitive that f6.3 is plenty fast enough for all daytime applications. In northern Norway in the winter the temperature is typically -20c, often getting down as low an -35c. Changing lenses is not something you want to do unless you really must when it’s this cold, so a zoom lens is what I like to use when I’m out and about on the show scooters.
Shooting 8K with the A1.
Wherever I could I shot with the A1 in 8K. I recorded internally to CFExpress type A cards using the XAVC-HS codec. When shooting 8K at 24fps the file size is 7860×4320. It is 10 bit 4:2:0 and the bit rate is 400Mb/s. When you shoot 24p at 4K using the XAVC-SI codec the bit rate is 240MB/s, so you might wonder how it’s possible to record frames that in 8K are 4 times larger than 4K with a codec only half the size. The XAVC-HS codec is based on the latest H265 codec. H265 is an ultra efficient long GoP codec. Long GoP codecs can be very efficient as they record a master frame called an “I” frame and then for the next group of frames they only record the differences between the first “I” frame and the next “I” frame. The GoP (group of pictures) can be anywhere up to 180 frames long (but is typically 24 to 60 frames long). This method of compressing moving images is very effective and very efficient. But it can sometimes struggle with very complex images where there is a lot of random motion. Random motion cause issues for the motion prediction algorithms in the codec. In my own footage from Norway, I did notice some minor artefacts in the rippling water within shots across the Fjords.
Filming water can be a real challenge for long GoP codecs, but the A1 did very well.
Moving water is always going to be tough for a Long GoP codec, But I suspect that unless you were actually looking for the artefacts most people wouldn’t notice them. When I graded the A1 footage I also found other very minor artefacts if I pushed the footage hard during the grade. But having said all of that, overall, I think the footage from the A1 looks pretty amazing.
One thing you really do need to consider if you are thinking of using the A1 to shoot 8K is that the XAVC-HS HEVC codec requires a lot of extra processing power to decode. So, your computer needs to be a fast one. Preferably one made in the last couple of years as the most recent processors and graphics cards now include special optimisations for the HEVC codec that will really help.
The sensor in the A1 uses Sony’s latest multi-layer stacked technologies. It is surprisingly sensitive and very low noise. It has excellent dynamic range, around 14 stops which is typical of most current large sensor cameras and very pleasing colour response.
Frame grab from the Alpha A1.
The camera performed better than I expected in low light and while for me at least the A7SIII/FX3 and FX6 remain the kings of low light, the A1 isn’t actually all that far behind. This is particularly impressive when you consider that the pixels in the A1 are much smaller than the pixels in the A7SIII. Having said that, it does appear that the A7S3/FX3/FX6 sensor combines 4 photosites under a single colour filter to create a single “pixel” – could they both be based on a very similar sensor? The A1 sensor is 8640 x 5760 while the A7S3 sensor is 4240 x 2832, the numbers are close enough to believe the underlying sensor could be the same.
For a camera with so many pixels the A1 has a very low level of rolling shutter, you are highly unlikely to encounter any significant rolling shutter issues thanks to the 16ms readout time at 8K. Again, it is interesting to note that the 8.7ms readout of A7S3/FX3/FX6 at 4K is almost exactly half that of the A1 – further pointing to sensor similarities.
Golden Hour = Golden Day.
One of the great things about Norway in the winter is that when the skies are clear the very low sun means that you get golden hour light almost all day. The A1 did an excellent job of capturing the rich colours and deep shadows, especially that deep orange light that seems to make objects glow. Rather than going for a film style grade I chose to use a high contrast and vibrant grade for the sample video. I edited the footage in DaVinci Resolve using ACES colour management. The initial grading was done in HDR and I have uploaded an 8K HDR version for those of you that have an HDR TV or monitor.
Beautiful golden hour colours captured by the Sony A1
The days in northern Norway in January are very short and brutally cold. You only have to look at the shots of the dog sled driver to see how well wrapped up he is. It got down to -34c the day we went dog sledding. Even without a cover the A1 performed very well in the cold. There was some loss of battery life but this is to be expected. If you do find yourself shooting somewhere very cold, try to keep your batteries in an inside pocket until you need them to keep them warm.
At night I decided to use the A1 to shoot time-lapse of the Aurora while using the FX3 to video the Aurora. The A1 has a built in intervalometer so it’s very easy to shoot timelapse with it.
The 24mm f1.4 GM lens.
A frame of the Aurora taken with the A1
Shooting stars at night with a wide angle lens is very challenging. You have to be very careful to ensure that your stars and in good focus. I use the cameras built in image magnification to check and double check my focus. One thing that many wide lenses suffer from is an optical defect called “coma”. Often stars that should be a tiny round point of light will take on a slightly elongated appearance, looking like a comma sign or comet rather than a dot, especially towards the edges and corners of the frame. My Sigma 20mm has very little coma and it’s one of the reasons why I like it so much. But the Sony 24mm f1.4 has even less, in fact it is almost completely non-existent. The 24mm is also very, very sharp even wide open, there is no need to stop down to sharpen the image as with some other lenses. It is also a very compact lens and yet despite its small size and low weight it manages to fit in a proper iris ring as well as the large focus ring. Like most of Sony’s most recent lenses the 24mm GM has a linear focus ring. Linear focus means that the amount you turn the focus ring for any given focus change remains completely constant. As a result, you can manually pull focus from one object to another very easily as each time you shift the focus back to your starting point the focus ring will return to exactly the same position each time.
While not quite as wide as my 20mm the clarity and lack of distortions in the images from the 24mm GM means that this lens is now easily my favourite lens for shooting the Aurora or star fields. Of course, it is also very competent for shooting during the day as well. The autofocus is very fast and completely silent due to the use of linear focus motors. The extra assignable button on the lens body is also very handy.
Together the A1 and the 24mm GM were a delight to use. I have to admit that I am wondering whether an A1 could replace my FX3 or FX6. The richness of the 8K images from the A1 are impressive to say the least. I have done a few 8K projects for clients already, But I am not yet regularly delivering in 8K and I don’t think it will be something that I will be asked for regularly for a couple years yet. Besides, most of my clients that do want 8K are really going to want me to shoot on a Venice 2 rather than the A1. I also don’t think I can push the A1 8K images in post quite as much as I can the XAVC-S-I or XAVC-I from the FX3/FX6. Plus, when you do start to do any heavy image manipulation at 8K even my MacBook M1 Max starts to bog down (I actually find it easier to work with the 8K XOCN from Venice 2 than the 8K XAVC-HS from the A1). The FX3 will remain my main camera for my Aurora shoots for the next couple of year but perhaps I will need to start saving some pennies to add an A1 to my camera collection, it certainly impressed me and it would be nice to start shooting some of my stock footage in 8K.
NOTE: To watch the video in 8K you will need a monitor, TV or device capable of 8K playback. To view in HDR you will need to be using an HDR TV or HDR monitor. If you do not have an 8K or HDR TV/Monitor then YouTube will detect this and instead send you a standard dynamic range verison of the video at the highest resolution that your device can support. For the best viewing experience please watch using a HDR device that supports HDR10 ST2084/Rec2020.
Sony Alpha 1. 8K 10 bit 4:2:0 Video makes this a very interesting camera.
Much rumoured for some time here it is, the Sony Alpha 1.
Some of the headlines are impressive to say the least:
Full Frame 8K 30fps recording from over sampled 8.6K recording using 10 bit 4:2:0 XAVC-HS. 200-400Mb/s. This should be possible for 30 minutes of continuous shooting.
5.8K over sampled Super35mm 4K shooting mode. Wow!!
4K up to 120fps, codecs including 10 bit intraframe and long GoP 16 bit raw output. EDIT: Originally I thought this would be oversampled from 8K up to 30fps, but I’m now hearing that it’s pixel binned. If that is the case there may be a lot of aliasing and moire in this mode.
S-Log3 and SGamut3.cine and YES it has S-Cinetone, so should be a good match for the FX6 and FX9.
15+ Stops of dynamic range in both video mode and 15 stops in photo mode.
5 Axis internal stabilisation. Built in motion detection gyros and image stabilisation as well as the ability to stabilise in post production with Catalyst Browse.
Faster eye AF and improved AF – how the hell can it get any better?
Available March 2021 for $6,500 USD – A lot of money for a stills camera but not a lot for an 8K, 15+ stop video camera!
Sony Alpha 1 Full Frame 8K 10 bit video capable camera with over sampled super 35mm 4K and 120fps!
I think this is a camera that simply cannot be ignored, whether you shoot corporate videos or make Hollywood blockbusters. I have never been a fan of the ergonomics of a stills camera when shooting video. The Alpha 1 does not have ND filters and you will need to use an MI shoe adapter to get XLR audio in. Also the LCD screen on the back is quite small to use as an LCD finder for video. But it does have a very nice built in OLED EVF that looks to be of exceptionally high quality. There doesn’t appear to be any LUT options or dedicated log shooting mode.
But despite these missing or not quite right for video things, you cannot ignore 8K, the over sampled Full Frame 4K and oversampled Super 35mm 4K – plus 4K 120fps. All in all, this camera ticks a lot of boxes. It could be very nice for chroma key or green screen applications.
It won’t be the low light monster that either the A7SIII or FX6 are. But given recent improvements in sensor technology you can bet the low light performance won’t be terrible.
I also have to wonder what this sensor and processing could do if repackaged into a video camera body. Throw in an ND filter system, a couple of SDI outs and a proper viewfinder – as done with the A7SIII – FX6 – Could this be turned into the F55 replacement many are looking for? If it was it could end up better than a Venice. Could this become the Venice II?
With many parts of Sony now coming under the Alpha Group, for example Pro cameras in the US are now sold by the “Digital Imaging” arm of Sony, the same people behind the Alpha cameras. Could we be seeing the start of a new approach for large sensor video cameras sharing a lot more common DNA than in the past and all coming from just one part of Sony. It makes sense. If they do turn this into a video camera with all the right options and ergonomics it could be an awesome piece of kit.
But let’s just slow down for a minute. I haven’t seen any footage other than via YouTube yet, so maybe it’s not as good as the specs suggest. If the Full Frame 4K is pixel binned that particular mode might not be so good. I suspect this camera is going to be awesome! But at the same time for video shooters the FX9 and FX6 still make a lot of sense. The variable ND is a huge time saver, I’m not sure I ever want to go back to carrying a box of ND’s. Do I need 8K? Certainly no one except Sony have ever asked me for 8K – Sony use it for the CLED video walls. If I did lots and lots of green screen or other effects work it could be beneficial – we need to see how good the codec is first.
And for a lot of what I do the low light, low noise performance of the FX6 and FX9 are important. Exactly how the Alpha 1 stacks up against them remains to be seen. Plus I find LUTs and a dedicated CineEI mode makes shooting Log or Raw so much simpler than having to expose S-Log3 correctly when shooting run n gun.
So while the idea of the Alpha one excites me a lot. I really want to see what it’s like to actually work with before passing final judgement.
I’m not impressed by the video below. Lots of over exposed shots and some odd grading choices which is a bit disappointing. Hopefully these are issues with the video production rather than the camera.
What I don’t know:
It can read the sensor at Full Frame 8K and 30fps, so I assume there is a Full Frame downsampled 4K recording mode. But can it record Full Frame 4K without pixel binning/skipping faster than 30fps? Or does it have to go down to a lower sampling rate or crop to go above 30fps?
What will the quality of the 4K 120fps be like. Can the full 8K sensor be read at 120fps.
I assume the 16 bit 4.3K raw out will be a downsample from the 8.6K Full Frame readout. Again limited to 30fps perhaps, or a reduced scan mode for higher frame rates?
This is from Sony:
New 50.1-megapixel (approx., effective) full-frame stacked Exmor RS™ CMOS image sensor in combination with an upgraded BIONZ XR™ imaging processing engine with eight times more processing power[i]
Blackout- free continuous shooting at up to 30 frames per second[ii]
Fast sensor readout enables up to 120 AF/AE calculations per second[iii], double the speed of the Alpha 9 II, even during 30fps continuous shooting
Bright and large 0.64-type 9.44 million-dot (approx.) OLED Quad-XGA electronic viewfinder with the world’s first[iv] refresh rate of 240 fps
Silent, vibration-free electronic shutter
World’s first[v] anti-flicker shooting with both mechanical and electronic shutter
Electronic shutter flash sync[vi] up to 1/200 sec. for the first time in the Alpha™ series
World’s fastestv mechanical shutter flash sync up to 1/400 sec.
8K 30p[vii] 10-bit 4:2:0 XAVC HS video recording with 8.6K oversampling for extraordinary detail and resolution, in addition to 4K 120p[viii] 10-bit 4:2:2 movie shooting capabilities
Wide dynamic range of 15 stops for stills[ix] and 15+ stops for video[x]
Improved Real-time Eye AF (autofocus) for humans and animals, and new Real-time Eye AF for birds[xi], as well as Real-time Tracking that automatically maintains accurate focus
5-axis optical in-body image stabilization for a 5.5-step[xii] shutter speed advantage
S-Cinetone color matrix as seen in FX9 and FX6to deliver expressive cinematic look
Professional workflow support with the industry’s fastest[xiii] built-in Wi-Fi, SuperSpeed USB 10Gbps, 1000BASE-T Ethernet and more
SAN DIEGO, CA – January 26, 2021 – Sony Electronics, a global leader in imaging sensor technology and digital imaging, has announced the arrival of the groundbreaking new full-frame mirrorless Alpha 1 camera – asserting their commitment to leading the industry with a stunning combination of innovative new features.
The most technologically advanced, innovative camera that Sony has ever released, the Alpha 1 combines high-resolution and high-speed performance at a level that has never been accomplished in the world of digital cameras. With a brand new 50.1-megapixel full-frame stacked Exmor RS™ image sensor, up to 120 AF/AE calculations per second, 8K 30p 10-bit 4:2:0 video and much more, the Alpha 1 will allow creators to capture what they’ve never been able to before.
“We are always listening to our customers, challenging the industry to bring new innovation to the market that goes far beyond their expectations.” said Neal Manowitz, deputy president for Imaging Products and Solutions Americas at Sony Electronics. “Alpha 1 breaks through all existing boundaries, setting a new bar for what creators can accomplish with a single camera. What excites us the most – more than the extensive product feature – is Alpha 1’s ability to capture that which has never been captured before. This camera unlocks a new world of creative possibilities, making the previously impossible now possible.”
The newly developed image sensor is built with integral memory and paired with an upgraded BIONZ XR imaging processing engine, making it capable of shooting 50.1-megapixel images continuously at an astounding 30fps with up to 120 AF/AE calculations per second. The Alpha 1’s shooting capabilities are further enhanced by a 9.44 million dot OLED Quad-XGA electronic viewfinder, with a refresh rate of up to 240 fps[xiv], ensuring no black out. Additionally, for the first time in an Alpha series camera, 8K 30p 10-bit 4:2:0 video is available. The Alpha 1 is also capable of 4K 120p / 60p 10-bit 4:2:2 recording and includes S-Cinetone color. The Alpha 1 is also packed with features that support field professionals with faster workflow, including 3.5 times faster wireless FTP transfer speed[xv] and more.
Unprecedented Resolution and Speed
Continuous Shooting at Up to 30 Frames Per Second
The Alpha 1 captures moments that would otherwise be lost thanks to its high-speed performance, providing any photographer the speed they require to capture fast-moving objects. High speed readout from the 50.1-megapixel image sensor and a large buffer memory make it possible to shoot up to 155 full-frame compressed RAW images[xvi] or 165 full-frame JPEG images[xvii]at up to 30 frames per second with the electronic shutter while maintaining full AF and AE tracking performance[xviii].
At an astonishing calculation speed of up to 120 AF/AE per second, the Alpha 1 can maintain focus with high accuracy even for fast moving subjects. It can automatically adjust exposure, even with sudden changes in brightness, with an AE response latency as low as 0.033 secondsii.
Advanced Electronic Viewfinder with the World’s Firstiv Refresh Rate of 240 fps
Complimenting the camera’s ability to capture images at an unprecedented speed, the Alpha 1 viewfinder features the world’s firstiv240 fps refresh ratexiv, for a super-smooth display. The viewfinder does not black out when an exposure is made to offer an uninterrupted view and allow for seamless framing and tracking, even during continuous shooting. The 9.44 million-dot (approx.), 0.64 type Quad-XGA high-definition OLED display and refined optics deliver the highest resolution in its classiv. It also offers 0.90x[xix] viewfinder magnification, a 41° diagonal FOV, and a 25mm-high eyepoint for clear, low distortion viewing from corner to corner.
Advanced Autofocus
Sony continues to push the boundaries of autofocus technology with the introduction of the Alpha 1, which can easily track complex, fast-moving subjects with high precision. The camera features 759 phase detection points in a high-density focal plane phase-detection AF system cover approximately 92% of the image area – ensuring accuracy and unfailing focus in environments where focusing might otherwise be difficult.
Sony’s advanced Real-time Eye AF improves detection performance by 30% over the previous systemi, thanks to the powerful image processing engine, BIONZ XR. It ensures accurate, reliable detection, even when the subject’s face looks away. In addition to improved Real-time Eye AF for humans and animals, the Alpha 1 employs high-level subject recognition technology to provide Real-time Eye AF for birdsxi, a first in an Alpha series camera. Optimized algorithms ensure that tracking is maintained even if a sitting bird suddenly takes flight, or the framing suddenly changes[xx].
The Alpha 1 also features AI-based Real-time Tracking that automatically maintains accurate focus. A subject recognition algorithm uses color, pattern (brightness), and subject distance (depth) data to process spatial information in real time at high speed.
Silent, Vibration-free Electronic Shutter
High-speed readout from the new image sensor has made it possible to reduce rolling shutter by up to 1.5 times when shooting stills, compared to the Alpha 9 II. It also offers silent anti-flicker continuous shooting with an electronic shutter for the first timev in the world. The electronic shutter[xxi] operates silently, without mechanical noise, and is vibration-free. Stress-free continuous shooting is now possible even when shooting in challenging lighting situations with florescent or other flicker-prone types of artificial lighting. And for the first time in an Alpha camera, electronic shutter flash sync up to 1/200 sec[xxii] is possible. The advantages of the electronic shutter advantages can now come to life even when using flash for broadly expanded shooting versatility.
Dual Driven Shutter System for 1/400 Flash Sync
The Alpha 1 boasts the world’s fastest flash sync speedv of 1/400 sec. with mechanical shutter, making it even easier to capture dynamic action. In addition to a carbon fiber shutter curtain, the Alpha 1 features the newly developed dual driven shutter system utilizing spring and electromagnetic drive actuator, offering high durability and lightness at the same time.
High Resolution Shooting Enhancements
Even with this sensor’s high pixel count, the Alpha 1 offers high sensitivity with low noise, plus 15+ stops of dynamic range for video and 15 stops for stills, for smooth, natural gradations from shadows to highlights thanks to its cutting-edge processing system, throughout a wide ISO sensitivity range of 100-32,000 (expandable to 50-102,400, when shooting stills).
Additionally, the new camera features an evolved Pixel Shift Multi Shooting mode that composites up to 16 full-resolution images. In this mode, the camera precisely shifts the sensor in one pixel or half-pixel increments to capture 16 separate pixel-shifted images containing a total of 796.2 million pixels of data, which are then composited into a 199 million pixel (17,280 x 11,520 pixels) image using Sony’s Imaging Edge™ desktop application. With a flash sync of up to 1/200 sec. in this mode, it is ideal for photographing architecture, art or any other still life subject with a level of detail and color accuracy that is simply stunning.
Professional Video Quality
8K High-resolution Movie Shooting
For the first time in an Alpha camera, the Alpha 1 offers 8K 30p 10-bit 4:2:0 XAVC HS recording with 8.6K oversampling for extraordinary resolution. Combined with Sony’s acclaimed autofocus technology, gradation and color reproduction performance, the Alpha 1 will help the user realize their creative vision with the finest detail. It’s 8K footage can also be used for flexible 4K editing during post-production.
Supporting Various Video Formats for Professionals
The Alpha 1 offers in-camera 4K recording at up to 120 frames per secondviii which allows the user to shoot up to 5X slow-motion video[xxiii]. In addition to supporting 10-bit 4:2:2 recording, this feature can be used with efficient Long GOP inter-frame compression or high-quality Intra (All-I) intra-frame compression.
The Alpha 1 features S-Cinetone, the same color matrix that produces the highly regarded FX9 and FX6 color and skin tones. It delivers natural mid-tones, plus soft colors and gorgeous highlights to meet a growing need for more expressive depth. The S-Log3 gamma curve makes it possible to achieve 15+ stops of dynamic range, while the S-Gamut3 and S-Gamut3.Cine color gamut settings make it easy to match Alpha 1 footage with video shot on VENICE cinema camera, FX9 and other professional cinema cameras.
Heat-dissipating Structure
A unique heat dissipating structure keeps image sensor and image processing engine temperatures within their normal operating range, preventing overheating while maintaining compact body dimensions. This makes it possible to record 8K/30p video continuously for approximately 30 minutes[xxiv].
Supporting Hand-held Shooting
A high-precision stabilization unit and gyro sensors, plus optimized image stabilization algorithms, achieve up to a 5.5-step shutter speed advantage, maximizing the quality of the high-resolution images derived from the camera’s 50.1-megapixel sensor. The Alpha 1 also features an Active Mode[xxv] that offers outstanding stabilization for handheld movie shooting. When using Sony’s desktop applications Catalyst Browse or Catalyst Prepare[xxvi] for post-production, an accurate image stabilization function is available which utilizes metadata generated by camera’s built-in gyro.
Other features that the Alpha 1 offers include; 16-bit RAW output[xxvii] to an external recorder[xxviii] via HDMI for maximum post-production flexibility, a digital audio interface has been added to the camera’s Multi Interface (MI) Shoe for clearer audio recordings from a compatible Sony external microphone, 5.8K oversampled full pixel readout without pixel binning for high-resolution 4K movies in Super 35mm mode and more.
Enhanced Workflow withNetwork Technologies including Connectivity to 5G Compatible Devices
The Alpha 1 has been designed and configured to support photo and video journalists and sports shooters who need to deliver stills or movies as quickly as possible with advanced connectivity options. It offers several features for fast, reliable file transfers. Industry’s fastestxiii built-in wireless LAN allows communication on 2.4 GHz and 5 GHz[xxix]bands with dual antennas to ensure reliable communications. 5 GHz includes 2×2 MIMO support (IEEE 802.11a/b/g/n/ac) offering 3.5 times faster wireless FTP transfer speed than the Alpha 9 II – a notable advantage for news and sports shooters who need to deliver with reliable speed. There is also a provided USB Type-C® connector to support fast data transfer when connected to a 5G mmWave compatible device such as Sony’s Xperia PRO and makes high-speed PC Remote (tethered) data transfer available for smooth handling of large image files. The Alpha 1 also has a built-in 1000BASE-T LAN connector for high-speed, stable data transfers, including remote shooting. FTPS (File Transfer over SSL/TLS) is supported, allowing SSL or TLS encryption for increased data security.
In addition to compressed and uncompressed RAW, the Alpha 1 includes efficient lossless compression with no quality degradation, Lossless Compressed RAW. There is also a new “Light” JPEG/HEIF image quality setting that results in smaller files than the “Standard” setting, allowing faster deliver for news and sports photographers who depend on speed. Along with a versatile range of RAW and JPEG formats, the Alpha 1 includes the HEIF (High Efficiency Image File) format for smooth 10-bit gradations that provide more realistic reproduction of skies and portrait subjects where subtle, natural gradation is essential. Images shot on the Alpha 1 can be trimmed in-camera to a desired aspect ratio, size, or position for versatile usage.
The Alpha 1 is also compatible with a variety of apps, add-ons and tools. With Imaging Edge Mobile and Imaging Edge Desktop[xxx], professionals can easily transfer RAW files and files that use lossless compression and remotely control Touch Tracking and Touch Focus for convenient AF operation. The Transfer & Tagging add-on (Ver. 1.3 or later) can automatically covert voice memos attached to image files to text captions or transfer the files to an FTP server from a mobile device. Desktop applications Catalyst Browse/Catalyst Preparexxvi allow professionals to browse and manage video clips shot by Sony’s camera. In addition, the Remote Camera Tool[xxxi] can remotely change camera settings and shoot from a computer connected via LAN cable and feature a number of refinements for the Alpha 1: faster transfer, touch response, dual slot and HEIF support, and more.
Reliable and Easy Operability
Professional users need more than just refined features and performance. They also need the reliability and durability demanded of any professional tool. The Alpha 1 has two media slots that both support UHS-I and UHS-II SDXC/SDHC cards, as well as new CFexpress Type A cards for higher overall capacity and faster read/write speeds. It also features a durable magnesium alloy chassis, long battery life with the Z-battery which can be extended using the optional VG-C4EM Vertical Grip (sold separately), an improved dust removal feature, shutter close function on power-off? to protect image sensor, plus dust and moisture resistance[xxxii] that maximizes reliability in challenging environments. It includes a durable, reliable HDMI Type-A connector, and USB PD (Power Delivery) support, allowing higher power to be supplied from an external source so that users can record for extended periods with minimal internal battery usage.
A revised menu structure provides easier navigation, and touch-responsive menu operation offers fast, more intuitive control with Touch Focus and Touch Tracking on its 3.0 type 1.44 million-dot (approx.) LCD monitor. For easy customization, a subset of the camera’s shooting settings now changes according to the selected shooting mode, making it easier than ever to use different aperture, shutter speed and other settings for shooting stills and movies.
Pricing and Availability
The Alpha 1 Full-frame Interchangeable-Lens Camera will be available in March 2021 for approximately $6,500 USD and $8,500 CAD. It will be sold at a variety of Sony’s authorized dealers throughout North America.
Exclusive stories and exciting new content shot with the new camera and Sony’s other imaging products can be found at www.alphauniverse.com, a site created to educate and inspire all fans and customers of Sony ? – Alpha brand cameras.
For detailed coverage on the new product on Alpha Universe, please visit this LINK.
The new content will also be posted directly at the Sony Photo Gallery.
Additionally, a product launch video focused on the Alpha 1 can be found at this LINK.
###
[i] Compared to the BIONZ X imaging processing engine.
[ii] “Hi+” continuous shooting mode. In focus modes other than AF-C, effective at 1/125 sec. or higher shutter speed. In AF-C mode, effective at 1/250 sec. or higher shutter speed, and the maximum continuous frame rate will depend on the shooting mode and lens used. 20 fps max. when shooting Uncompressed or Lossless compressed RAW.
[iii] At shutter speeds of 1/125 sec. or higher. The number of AF calculations will depend on the lens used.
[iv] As of January 2021, Sony survey. Among full-frame mirrorless cameras.
[v] As of January 2021, Sony survey. Among full-frame interchangeable-lens digital still cameras.
[vi] Up to 1/200 sec. Synchronization via the sync terminal is not available for electronic shutter.
[vii] [APS-C S35 Shooting] is fixed [Off] when shooting 4K 120p and 8K movies.
[xx] Accurate focus may not be achieved with certain subjects in certain situations.
[xxi] Shutter speed slower than 0.5 sec. cannot be set while continuous shooting. Tracking performance and max. aperture differs by settings and lenses.
[xxii] Up to 1/200 sec. Synchronization via the sync terminal is not available for electronic shutter.
[xxiii] Post-production editing and S&Q mode recording required. Data must be recorded to a CFexpress Type A memory card when the frame rate is 120 (100) fps or higher.
[xxiv] Sony internal tests with [Auto Power OFF Temp.] set to [High].
[xxv] Active Mode is not available for 8K recording.
[xxvi] Catalyst Browse™ version 2020.1 or later, Catalyst Prepare version 2020.1 or later are required.
Damn, I just purchased a Sony A6000 to take to Norway next week and this pops up. It’s the latest camera in the compact camera range from Sony that started with the NEX-5 and NEX-3, great little cameras that take great photos and have been timelapse work-horses for me.
The A6300 specs are beyond impressive. It has a new 25MP sensor with an improved type of construction that improves sensitivity. It’s only APS-C so I’m not expecting A7 MK2 performance, but it should do very well when the light levels are low.
One of the headline features for me though is it’s ability to shoot 4K XAVC-S that is originated from a 6K image coming off the sensor. On top of that this truly pocket sized camera has what appear to be the full compliment of cinegammas as well as S-log2 and S-log3. Now before everyone gets too excited, do remember that XAVC-S is 8 bit whether in HD or SD, but even so this is an amazing feature set for this kind of camera.
If that isn’t enough it can even shoot in HD at upto 120fps!
The price? Well the body only is $999 USD. It’s E-Mount so as usual you can put all kinds of lenses on it from Sony power zooms to PL mount primes and everything in between. For more information on what on paper at least appears to be a remarkable little camera click here.
When you think of cine lenses then there are several brands that immediately come to mind. Zeiss, Arri, Cooke and Angenieux are probably the most familiar names but there are many others too. One brand I have been looking at more and more recently is Schneider.
Schneider Kreuznach have been making lenses since 1913. Based in Kreuznach in Germany they have long been know for their innovative designs and they won an Oscar in 2001 for Technical Achievement for their Super-Cinelux motion picture lenses.
A few years ago I met one of their lens engineers at NAB. I don’t think I have ever met a man as passionate about a lens design before or since. Every Schneider lens that I have ever used has been brilliant. They always seem to have near zero breathing, are always extremely solidly built and produce great images. So when I got a call from Manfrotto, the UK distributor to see if I would like a chance to play with some of the new Xenon FF (Full Frame) lenses I grabbed the opportunity.
Another view of the 50mm Schneider Xenon FF lens.
The Xenon FF lenses are cine style lenses available with either Canon, Nikon or PL mounts. The mounts can be changed should you need to switch mounts at a later date. They are priced to directly compete with the Zeiss compact primes. At the moment there are only 3 lenses available, a 35mm, 50mm and 75mm, all are T2.1. In the near future there will also be a 25mm and 100mm T2.1 as well as an 18mm T2.4 Yum Yum! I’d love to have one of those for my Northern Lights or Storm Chasing expeditions. They are all the same size, have a 100mm front diameter, all have a 95mm lens thread. This means that swapping lenses during a shoot is straight forward as you don’t have to change Matte Box donuts or re-position the follow focus if you’re using one. Being Full Frame lenses and rated for 4K these should be a great match with the Sony A7s.
I got to play with a 35mm and 50mm with EF mount and decided to try them on my full frame A7s shooting in HD as well as taking a few still photos (which are the equivalent to 4.5K) on a cloudy and rainy day.
14 blade iris and EF mount on the 35mm Xenon FF.
Straight out of the box you cannot help but be impressed by the build quality. These are substantial lenses, weighing in at around 1.25kg each with the EF mount. I could not find any plastic on these lenses, they look built to last.
The focus scale is large and easy to read, each lens being individually calibrated. Focus travel is a full 300 degrees. Even as you get to the far end of the focus ring the distances are still nicely spaced. From 9ft(3m) to infinity is around 100 degrees. Compare that to most DSLR lenses where the same focus range might be compressed into just 5 or 10 degrees and you can see that precise focus is much easier. Although sometimes a very large focus travel can make focus pulls a little harder simply because or the large distance the focus ring has to be turned. But I’ll take a big focus throw lens over small throw any day.
The lenses have 14 curved iris blades giving a very round aperture even when stopped right down. I love peering into these lenses at the aperture blades as they are a work of art (but really hard to take a photo of). You can also see in the photo that the coatings of the lens are a distinct orange colour.
Photo taken with the 50mm Xenon FF. Click on the image to enlarge or view at original resolution.
In practice the lenses did not disappoint. It did seem a bit odd to have such a large and heavy lens on the diminutive A7s, but as image quality starts with the lens a good lens can make all the difference. I shot at various apertures from wide open at T2.1 down to about T8 and didn’t notice any significant change in resolution across the range (I took photos as well as video to check the lens performance).
The lenses do tend to flare a little bit, the 35mm more than the 50mm, but I thought the flares were quite pleasing, others may disagree. Take a look at the video to get an idea of what they are like. There was a bit more flare at T2.1 compared to T2.8 or T4 on both lenses.
I did some big focus pulls to see how much breathing there was and as with all the Schneider lenses I’ve used breathing was very minimal. There is some breathing, these are not like the Cine-Xenars which have virtually zero breathing, but the breathing really is small.
Frame grab, shooting through trees. 35mm Xenon FF and A7s.
Another test shot was to shoot some tree branches silhouetted against the sky to check for CA and colour fringing. Basically I can’t see any. Maybe right out in the very corners of the frame there is the tiniest bit of CA, but you really have to hunt for it.
Shopping basket frame grab. 35mm Xenon FF. I love the smoothness to the highlights.
Colour wise there is no obvious colour shift, if anything perhaps very, very slightly warm. As expected the lenses are very sharp and crisp, from corner to corner, but not excessively so. I found that the images contained a lot of detail but had a pleasing roundness too them that I really like. I shot a chrome shopping basket and the reflections of the bright chrome look really nice. I think this is a combination of a little bit of flare without excessive sharpness. I think it’s a very nice natural look. This can be one of the benefits of a video lens over a stills lens. Stills lenses must be incredibly sharp to work with 24 or 36 mega pixel sensors. Sometimes this results is a super sharp image that lacks character. Arguably if you start with a very sharp image you can always soften it a bit in post, but sometimes it’s nice to start off with a more rounded image. Look at how popular Cooke lenses are, they are well known for their rounded rather than super sharp images.
As expected from a 14 blade iris the bokeh is very creamy and smooth. Both near and far out of focus areas look very good indeed. Out of focus edges are smooth and don’t show any obvious double edges or other distortions.
It’s really easy to get a very shallow DoF with a full frame sensor. Xenon FF 50mm and A7s.
Take a look at the video for a better idea of the lens flares and the overall image quality. I really like the look you get from these lenses and wouldn’t mind a set of them for myself. I feel they have a lot in common with Cooke lenses, but at a much more affordable price. I hope to test them further in the near future and to a wider variety of scenes. I suspect they will be very good on skin tones and faces.
This guide is for the A7S and A7SII. The A7SIII does not in my opinion need the same degree of over exposure as documented here. So please bear this in mind if using the A7SIII.
This document has been prepared independently of Sony. It is based on my own findings having used the camera and tested various exposure levels and methods. Part 2 which explains how to use LUT’s to correct the footage in the edit suite or post production is here: https://www.xdcam-user.com/2014/10/using-s-log2-from-the-a7s-in-post-production/
If you find this useful please consider buying me a coffee or a beer. I’m not paid to write these articles.
One of the really nice features of the Sony A7s and Sony’s other Alpha cameras, including the A6300, A6500 etc is the ability to use different gamma curves and in particular the Sony S-Log2 gamma curve.
What are gamma curves?
All conventional cameras use gamma curves. The gamma curve is there to make the images captured easier to manage by making the file size smaller than it would be without a gamma curve. When TV was first developed the gamma curve in the camera made the signal small enough to be broadcast by a transmitter and then the gamma curve in the TV set (which is the inverse of the one in the camera) expanded the signal back to a normal viewing range. The current standard for broadcast TV is called “Recommendation BT-709”, often shortened to Rec-709. This gamma curve is based on standards developed over 60 years ago and camera technology has advanced a lot since then! Even so, almost every TV and monitor made today is made to the Rec-709 standard or something very similar. Many modern cameras can capture a brightness range, also known as dynamic range, that far exceed the Rec-709 standard.
The limitations of standard gammas.
As gamma effects the dark to light range of the image, it also effects the contrast of the image. Normal television gamma has a limited dynamic range (about 6 to 7 stops) and as a result also has a limited contrast range.
When shooting a high contrast scene with conventional gamma the brightest highlights and the darkest shadows cannot be recorded. The contrast on the TV or monitor will however be correct as the camera captures the same contrast range as the monitor is able to display.
Normally the gamma curve used in the camera is designed to match the gamma curve used by the TV or monitor. This way the contrast range of the camera and the contrast range of the display will be matched. So the contrast on the TV screen will match the contrast of the scene being filmed and the picture will look “normal”. However the limited dynamic range may mean that very bright or very dark objects cannot be accurately reproduced as these may exceed the gammas dynamic range.
Although the dynamic range of Rec-709 may not always capture the entire range of the scene being shot, as the gamma of the camera matches the gamma of the TV the contrast will appear correct.
The over exposure typical of a restricted range gamma such as Rec-709 is commonly seen as bright clouds in the sky becoming white over exposed blobs or bright areas on faces becoming areas of flat white. Objects in shade or shadow areas of the scene are simply too dark to be seen. But between the overexposed areas and any under exposure the contrast looks natural and true to life.
Typical limited Rec-709 exposure range. Contrast is good but the clouds are over exposed and look un-natural.
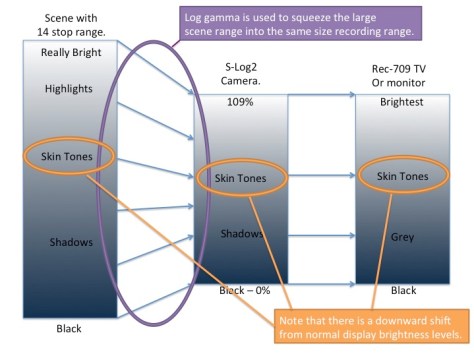
Log Gamma.
Log gamma, such as Sony’s S-Log2, allows the camera to capture a much greater brightness range or dynamic range than is possible when shooting with conventional television gamma. Dynamic range is the range from light to dark that the camera can capture or the range that the monitor or TV can display within one image. It is the range from the deepest blacks to the brightest whites that can be captured or shown at the same time.
There are some things that need to be considered before you get too excited about the possibility of capturing this much greater dynamic range. The primary one being that if the camera is set to S-log2 and the TV or monitor is a normal Rec-709 TV (as most are) then there is no way the TV can correctly display the image being captured, the TV just doesn’t have the range to show everything that the camera with it’s high range log gamma can capture accurately.
Fixed Recording Range For Both Standard and Log Gamma.
The signal range and signal levels used to record a video signal are normally described in percent. Where black is 0% and the brightest thing that can be recorded is normally recorded at 100% to 109%. Most modern video cameras actually record the brightest objects at 109%. The important thing to remember though is that the recording range is fixed. Even when you change gamma curve the camera is still constrained by the zero to 109% recording range. The recording range does not change whether you are recording Rec-709 or S-log2. So log gamma’s like S-Log2 must squeeze a much bigger signal range into the same recording range as used by conventional Rec-709 recordings.
Log gamma squeezes the scenes large range to fit in the camera’s normal 0%-109% recording range.
Recording S-Log2.
In order to record using S-log2 with the A7s you need to use a picture profile. The picture profiles give you several recording gamma options. For S-log2 you should use Picture Profile 7 which is already set up for S-log2 and S-Gamut by default (for information on gamuts see this article). In addition you should ALWAYS use the cameras native ISO which is 3200 ISO and it is normally preferable to use a preset white balance. Using any other ISO with S-log2 will not allow you to get the full benefit of the full 14 stops of dynamic range that S-log2 can deliver. In most of the Alpha cameras you now also have the ability to use a different version of S-log, – S-Log3 and this is found in picture profiles 8 and 9. You can use S-Log3 if you wish, but S-Log2 was designed from the outset by Sony to work with digital camera sensors. S-Log3 is based on an older curve designed for film transfers to a 10 bit recording. As a result when using a camera that only has 8 bit recording with a limited number of code values, S-Log2 tends to be more efficient and yield a better end result. This is what it was designed for.
Grey Cards and White Cards.
Before I go further let me introduce you to grey and white cards in case you have not come across them before. Don’t panic you don’t have to own one, although I would recommend getting a grey card such as the Lastolite EzyBalance if you don’t have one. But it is useful to understand what they are.
The 90% White Card.
The 90% white card is a card or chart that reflects 90% of the light falling on it. This will be a card that looks very similar in brightness to a piece of ordinary white paper, it should be pure white, some printer papers are bleached or coloured very slightly blue to make them appear “brilliant white” (as you will see later in many cases it is possible to use an ordinary piece of white paper in place of a 90% white card for exposure).
The Grey Card.
The 18% grey card, also often called “middle grey” card, is a card that reflects 18% of the light falling on it. Obviously it will appear much darker than the white card. Visually to us humans an 18% grey card appears to be half way between white and black, hence it’s other name, “middle grey”.
Middle grey is important because the average brightness level of most typical scenes tends to be around the middle grey brightness value. Another key thing about middle grey is that because it falls in the middle of our exposure range it makes it a very handy reference level when measuring exposure as it is less likely to be effected by highlight compression than a 90% white card.
Exposing White and Middle Grey.
Coming back to Rec-709 and conventional TV’s and monitors. If we want a piece of white paper to look bright and white on a TV we would record it and then show it at somewhere around 85% to 95% of the screens full brightness range. This doesn’t leave much room for things brighter than a white piece of paper! Things like clouds in the sky, a shiny car, a bright window or a direct light source such as a lamp or other light. In order to make it possible for S-log2 to record a much greater dynamic range the recording level for white and mid tones is shifted down. Instead of recording white at 85%-95%, when using S-log2 or S-Log3 it is recommended by Sony that white is recorded at around 60%. For S-Log2 Middle grey moves down too, instead of being recorded at 42%-43% (the normal level for Rec-709) it’s recorded at just 32% with S-Log2 (S-log3 uses 41%).
By recording everything white (ie a white piece of paper) and darker in a lower range, we free up lot of extra space above the white recording level, within the full recording range, to record all those bright highlights in any scene that would be impossible to record with conventional gammas where there is only 10% to 20% from white at 90% to the peak of the recording range at 100 to 109%.
To make room for the extra dynamic range and the ability to record very bright objects, white and mid tones are shifted down in level by the S-log2 gamma curve. As a result, white, mid tones etc will be displayed darker than normally expected with conventional gamma.
As S-Log2 and S-Log3 normally shift a lot of the recording levels downwards, if we show a scene shot with S-Log2 or S-log3 that has been exposed correctly on a conventional TV or monitor it will look dark due to the lower recording levels. In addition it will look flat with very low contrast as we are now squeezing a much bigger dynamic range into the limited conventional Rec-709 display range of a normal TV or computer monitor.
The on screen contrast appears reduced as the capture contrast is greater than the display contrast.
This on screen reduction in contrast and the darker levels are actually perfectly normal when shooting using log gamma, this is how it is supposed to look on a normal monitor or TV. So don’t be alarmed if when shooting using S-Log your images look a little darker and flatter than perhaps you are used to when shooting with a standard gamma. You will adjust the S-Log footage in post production to restore the brightness and contrast later.
Correctly exposed S-Log2 can look dark and washed out.
The post production adjustment of S-Log2 and S-log3 is very important and one of the keys to getting the very best finished images. The S-Log recording acts as a digital negative and by “processing” this digital negative in post production (normally referred to as “grading”) we manipulate the large 14 stop dynamic range of the captured image to fit within the limited display range of a Rec-709 TV in a pleasing manner. This may mean pulling up the mid range a bit, pulling down the highlights and bit and generally shifting the brightness and colour levels of different parts of the image around (see PART 2 for more post production information).
SLog-2 and 10 bit or 8 bit data.
Originally Slog-2 was designed for use on high end digital cinema cameras such as Sony’s F65 camera. These cameras have the ability to record using 10 bit data. A 10 bit recording can have up to around 1000 shades of grey from black to white. The A7s however uses 8 bit recording which only has a maximum of 235 shades from black to white. Normally 8 bit recording is perfectly OK as most transmission and display standards are also 8 bit. Shoot with an 8 bit camera and then display that image directly via an 8 bit system and nothing is lost. However when you start to grade and manipulate the image the difference between 8 bit and 10 bit becomes more significant. If you start to shift levels around, perhaps stretching out some parts of the image then the increased tonal resolution of a 10 bit recording helps maintain the very highest image quality. Photographers that have shot using both jpeg and raw will know how much more flexibility the 12 bit (or more) raw files have compared to the 8 bit jpeg’s. However they will also know that 8 bit jpeg’s can be also adjusted, provided you don’t need to make very large adjustments.
Contrary to popular belief heavy grading of 8 bit footage does not necessarily lead to banding in footage across smooth surfaces except in extreme cases. Banding is more commonly a result of compression artefacts such as macro blocking. This is especially common with very highly compressed codecs such as AVCHD. The 50Mbps XAVC-S codec used in the Sony Alpha cameras is a very good codec, far superior to AVCHD and as a result compression artefacts are significantly reduced, so banding will be less of an issue than with other lower quality codecs. If you’re going to shoot using S-Log2, some grading will be necessary and as we only have 8 bit recordings we must take care to expose our material in such a way as to minimise how far we will need to push and pull the material.
Getting Your Exposure Right.
When S-Log2 was developed the engineers at Sony produced tables that specified the correct exposure levels for s-Log2 which are:
As you can see the nominal “correct” exposure for S-Log2 is a lot lower than the levels used for display on a typical Rec-709 TV or monitor. This is why correctly exposed s-log2 looks dark on a conventional TV. The implication of this is that when you grade your footage in post production you will have to shift the S-log2 levels up quite a long way. This may not be ideal with an 8 bit codec, so I decided to carefully test this to determine the optimum exposure level for the A7s.
Correct Exposure.
The panel of images below is from the A7s recording S-log2 and exposed at the Sony recommended “correct” 32% middle grey level. The correct exposure was determined using a grey card and an external waveform monitor connected to the cameras HDMI output. Then the S-log2 was corrected in post production to normal Rec-709 levels using a Look Up Table (LUT – more on LUT’s in part 2). You can also see the viewfinder display from the camera. If you click on the image below you can expand it to full size. Sorry about the shadow from the laundry line, I didn’t see this when I was shooting the test shots!
Correctly exposed S-Log2 from A7s.
From this you can see just how dark and low contrast looking the original correctly exposed S-log2 is and how much more vibrant the corrected Rec-709 image is. I have also indicated where on the cameras histogram middle grey and white are. Note how much space there is to the right of white on the histogram. This is where the extra highlight or over exposure range of S-log2 can be recorded. When correctly exposed S-log2 has an exposure range of 6 stops above middle grey and 8 stops under.
Over Exposing or “Pushing” S-log2.
If we deliberately raise the exposure level above the Sony recommended levels (known as pushing the exposure), assuming you grade the image to the same final levels some interesting things happen.
For each stop we raise the exposure level you will have 1 stop (which is the same as 6db) less noise. So the final images will have half as much noise for each stop up you go. This is a result of exposing the image brighter and as a result not needing to raise the levels in post as far as you would if exposed at the normal level.
You will loose one stop of over exposure headroom, but gain one stop of under exposure headroom.
Bright highlights will be moved upwards into the most compressed part of the log gamma curve. This can result in a loss of texture in highlights.
Skin tones and mid tones move closer to normal Rec-709 levels, so less manipulation is need for this part of the image in post production.
This last point is important for the A7s with it’s 8 bit codec, so this is the area I looked at most closely. What happens to skin tones and textures when we raise the exposure?
Exposing at +1, +2 and +3 Stops.
Below are another 3 panels from the A7s, shot at +1 stop, +2 stops and +3 stops. Again you can click on the images if you wish to view them full size.
A7s S-Log2 over exposed by one stop.
A7s S-Log2 over exposed by 2 stops.
A7s S-Log2 over exposed by 3 stops.
Looking at these results closely you can see that when you increase the exposure by 1 stop over the Sony specified correct level for S-log2 there is a very useful reduction in noise, not that the A7s is particularly noisy to start with, but you do get a noticeably cleaner image.
Below are 4 crops from the same images, after grading. I really recommend you view these images full size on a good quality monitor. Click on the image to view larger or full size.
Crops at different exposure of LUT corrected A7s S-log2 footage.
The noise reduction at higher exposures compared to the base exposure is very clear to see if you look at the black edge of the colour checker chart (the coloured squares), although the difference between +2 and +3 stops is very small. You can also see further into the shadows in the +3 stop image compared to the base exposure. A more subtle but important effect is that as the exposure goes up the visible texture of the wooden clothes peg decreases. The grain can be clearly seen at the base level but by +3 stops it has vanished. This is caused by the highlights creeping into the more compressed part of the log gamma curve. The same thing is happening to the skin tones in the +3 stop image, there is some reduction of the most subtle textures.
From this we can see that for mid tones and skin tones you can afford to expose between 1 and 2 stops above the Sony recommended base level. More than 2 stops over and brighter skin tones and any other brighter textures start to be lost. The noise reduction gain by shooting between one and 2 stops over is certainly beneficial. The down side to this though is that we are reducing the over amount of exposure headroom.
As you raise the exposure level you reduce the over exposure headroom.
Given everything I have seen with this 8 bit and almost every other 8 bit camera my recommendation is to shoot between the Sony recommended base S-log2 level and up to two stops over this level. I would try to avoid shooting more than 2 stops over as this is where you will start to see some loss of texture in brighter skin tones and brighter textures. Exactly where you set your exposure will depend on the highlights in the scene. If you are shooting a very bright scene you will possibly need to shoot at the Sony recommended level to get the very best over exposure headroom. If you are able to expose higher without significantly compromising any highlights then you should aim to be up to 2 stops over base. But whatever you do never expose darker than the Sony base level, this will normally look really nasty.
Determining The Correct Exposure.
The challenge of course is determining where your exposure actually is. Fortunately as we have seen, provided you in the right ball park, S-log2 is quite forgiving, so if you are a little bit over exposed it’s probably not going to hurt your images much. If you have a waveform monitor then you can use that to set your exposure according to the table below. If you don’t have proper white or grey cards you can use a piece of normal white paper. Although slightly less accurate this will get you very close to where you want to be. Do note that white paper tends to be a little brighter than a dedicated 90% reflectivity white card. If you don’t have any white paper then you can use skin tones, again a bit less accurate but you should end up in the right zone.
My suggested exposure levels for the Sony A7s. The “sweet spot” is from normal to +2 over.
If you don’t have an external waveform monitor then you do still have some good options. Sadly although the camera does have zebras, these are not terribly useful for S-log2 as the lowest the zebras can go is 70%.
Light Meter: You could use a conventional photography light meter. If you do choose to use a light meter I would recommend checking the calibration of the light meter against the camera first.
Mark 1 Eyeball: You could simply eyeball the exposure looking at the viewfinder or rear screen but this is tricky when the image is very flat.
In Camera Metering: The cameras built in metering system, like the majority of DSLR’s is calibrated for middle grey. By default the camera uses multi-point metering to measure the average brightness of several points across the scene to determine the scenes average brightness and from there set the correct base S-log2 exposure.
Auto Exposure:
When you are using S-Log2, auto exposure in most cases will be very close to the correct base exposure if you use the default Multi-Zone exposure metering. The camera will take an average exposure reading for the scene and automatically adjust the exposure to the Sony recommended 32% middle grey exposure level based on this average. In the P, A and S modes you can then use the exposure compensation dial to offset the exposure should you wish. My recommendation would be to add +1 or +2 stops via the dial. Then observe the histogram to ensure that you don’t have any significant over exposure. If you do then reduce the exposure compensation. Lots of peaks to the far right of the histogram is an indication of over exposure.
Manual Exposure And Internal Metering.
If you are exposing manually you will see a small M.M. indication at the bottom of the LCD display with a +/- number. In the eyepiece viewfinder this appears as a scale that runs from -5 to +5, in S-log2 only the -2 to +2 part of the scale is used. In both cases this is how far the camera thinks you are away from the optimum exposure. + meaning the camera is over exposed, – meaning under.
A7s Viewfinder indications in manual exposure mode showing both M.M. offset from metered exposure and histogram.
In the image above we can see the M.M. indication is +0.3, in the eyepiece you would see a small arrow one bar to the right of “0” , indicating the cameras multi zone metering thinks the shot is just a little over exposed, even though the shot has been carefully exposed using a grey card and external waveform monitor. This error is probably due to the large amount of white in the shot, white shirt, white card, test charts with a lot of brighter than grey shades. In practice an error of 0.3 of a stop is not going to cause any real issues, so even if this was exposed by setting the exposure so that you have “M.M. 0.0” the exposure would be accurate enough. But it shows that multi point exposure averaging is easily confused.
The scene above is a fairly normal scene, not excessively bright, not particularly dark. If shooting a snow scene for example the cameras multi point averaging would almost certainly result in an under exposed shot as the camera attempts to bring the bright snow in the scene down to the average middle grey level. If shooting a well lit face against a very dark background then the averaging might try to bring the background up and the shot may end up overexposed.
If you want really accurate exposure then you should put the cameras metering system into the spot metering mode where instead of taking an average of various points across the scene the camera will just measure the exposure at the very center of the image.
A7s Spot Metering Mode.
You can then use a grey card to very accurately set the exposure. Simply place the circular shaped symbol at the center of the viewfinder display over a grey card and set the exposure so that M.M is 0.0 for the correct S-Log2 base exposure. To expose 1 stop over with a grey card, set M.M. +1.0 and two stops over M.M. +2.0 (not flashing, flashing indicates more than +2 stops).
Using Spot Metering to set exposure correctly for S-log2. MM 0.0.
One small issue with this is that the camera will only display a M.M. range of -2.0 to +2.0 stops. Provided you don’t want to go more than 2 stops over base then you will be fine with a grey card.
Using White Instead of Grey:
If you don’t have a grey card then you can use a 90% reflectivity white target. As white is 2 stops brighter than middle grey when S-Log2 is correctly exposed the 90% white should indicate M.M +2.0.
Using spot metering to set the correct exposure for S-Log2. M.M should read M.M +2.0 for a 90% reflectivity white target.
Once you have established the correct exposure you can then open the iris by 1 or two stops to increase the exposure. Or halve the shutter speed to gain a one stop brighter exposure. Each time you halve the shutter speed your exposure becomes one stop brighter, so divide the shutter speed by 4 to gain a 2 stop increase in exposure. As always you should observe the histogram to check for any over exposure. White peaks at the far right of the histogram or disappearing completely off the right of the histogram is an indication of over-exposure. In this case reduce your exposure back down towards the base exposure level (M.M 0.0 with a a grey card).
Exposure Summary:
I recommend using an exposure between the “correct” base S-Log2 exposure level of middle grey at 32% and two stops over this. I would not recommend going more than 2 stops over over base.
In the P, A and S auto exposure modes, when using the default multi-zone metering the camera will set the base S-log2 exposure based on the average scene brightness. For most typical scenes this average should be very close to middle grey. This exposure can then be increased (brightened) by up to 2 stops using the exposure compensation dial.
In manual exposure the “M.M.” number displayed at the bottom of the viewfinder display is how far you are from the correct base S-log2 exposure. M.M. +2.0 indicates +2 stops over base. If using multi zone metering (the cameras default) this exposure will be based on the scenes average brightness.
If you set the metering to “Spot” you can use a grey card centred in the image to determine the correct base exposure and up to 2 stops of over exposure via the M.M. indication when shooting manually.
In Part 2:
In part two I will take a look at grading the S-log2 from the A7s and how to get the very best from the S-log2 images by using Look Up Tables (LUT’s).
Don’t forget I run storm chasing and Northern Lights expeditions every year. These are amazing expeditions by snowmobile up on to the Finnmarksvidda. We go ice fishing, dog sledding, exploring, cook a meal in a tent and enjoy traditional Norwegian saunas.
I’ve been doing a lot of work on shooting SLog-2 with the A7s. I realised almost straight away that a set of LUT’s for this camera would really help speed up my grading and testing. In addition as the camera is only 8 bit I have found that I am actually getting the best results from the Slog-2 if I over expose it just a little bit, depending of course on the scene. So I created a set of LUT’s that includes compensation for shooting at the nominal correct exposure as well as either 1 or 2 stops over exposed. In all there are 20 LUT’s in two sets. One is Rec-709 based LUT’s and the other Filmic LUT’s to act as starting points for further grading.
I am in the process of creating the complete workflow and SLog-2 guide for the A7s which I should be publishing later next week which will have much more information on how to use these LUT’s. But in the mean time here are the LUT’s if anyone want’s to play (and I would like feedback on what you think of them).
The LUT naming goes something like this:
AC A7S 709(800) ZERO
AC (That’s me!). A7S (The Camera).
709(800) = Output gamma or style. ZERO = Exposure off set.
The exposure offset refers to the number of stops the footage is over exposed by relative to the normal SLog2 exposure level of Middle Grey at 32% and 90% white at 59%. ZERO menas no exposure offset. 1STOP would be used when the SLog2 was exposed 1STOP over and in this case the LUT then shifts the exposure back down 1 stop to compensate.
709 = Vanilla Rec-709, very contrasty, but limited highlight response and hard clip of over exposure.
709(800) = Rec-709 gamma with 800% (high) dynamic range. Will be slightly low contrast but deals much better with over exposure or bright highlights than vanilla 709.
Film-Like1 = An extended range gamma with highlight roll off (+400% range), slightly de-saturated, slightly more film like color (small red/yellow removed).
Filmic2 = Extended range low contrast gamma with very good over exposure handling. Slightly de-saturated. Good grading start point.
Filmic3 = Similar to Filmic2 but a little more contrast at the expense of a little less highlight roll off.
Click on the links below to download the LUT sets. PLEASE DO NOT HOST THESE ELSEWHERE OR DISTRIBUTE THESE ELSEWHERE OR VIA ANY MEANS OTHER THAN A LINK TO THIS PAGE.
To provide the best experiences, we use technologies like cookies to store and/or access device information. Consenting to these technologies will allow us to process data such as browsing behavior or unique IDs on this site. Not consenting or withdrawing consent, may adversely affect certain features and functions.
Functional
Always active
The technical storage or access is strictly necessary for the legitimate purpose of enabling the use of a specific service explicitly requested by the subscriber or user, or for the sole purpose of carrying out the transmission of a communication over an electronic communications network.
Preferences
The technical storage or access is necessary for the legitimate purpose of storing preferences that are not requested by the subscriber or user.
Statistics
The technical storage or access that is used exclusively for statistical purposes.The technical storage or access that is used exclusively for anonymous statistical purposes. Without a subpoena, voluntary compliance on the part of your Internet Service Provider, or additional records from a third party, information stored or retrieved for this purpose alone cannot usually be used to identify you.
Marketing
The technical storage or access is required to create user profiles to send advertising, or to track the user on a website or across several websites for similar marketing purposes.


 Damn, I just purchased a Sony A6000 to take to Norway next week and this pops up. It’s the latest camera in the compact camera range from Sony that started with the NEX-5 and NEX-3, great little cameras that take great photos and have been timelapse work-horses for me.