Category Archives: lenses

Cooke SP3 compact lenses – I’m in love!

I have always liked Cooke lenses, especially their anamorphic lenses. And lenses are so, so important these days. The cameras we have available to us are fantastic, they are almost all capable of producing beautiful images. Grading allows you to make almost any camera look like any other. So the one item that can really make a difference is the lens. Everything about the quality of the images you produce starts with the lens. I’d rather have a great lens on a lesser camera than a lesser lens on a great camera.

Typically Cooke lenses have been PL mount and often heavy. As cameras get smaller and lighter it has been a challenge to find beautiful looking compact lenses that work well on smaller cameras (although we do have more choices than ever before thanks to companies like Sirui).  

So, when I was first shown one of Cookes new SP3 full frame prime lenses, with a Sony E-Mount I was both surprised and excited. Then when I finally got to put one on a Sony camera for a shoot I was not in the slightest bit disappointed. I was the technical consultant and DiT for a big shoot in South Africa with DP Mostafa Fahmy. We decided to use the Cooke SP3 for this shoot and we were not disappointed.

SA-Shoot-Face1_2.1.1-copy-scaled Cooke SP3 compact lenses - I'm in love!

The SP3’s are based on the classic Cooke Panchros. They cover full frame and are T2.4. They have a single coating and initially will come in E-Mount with RF-Mount to follow very quickly. The lens mount is user swappable. L-Mount and M-Mount are planned for early 2024.

Screenshot-2023-09-05-at-17.08.20 Cooke SP3 compact lenses - I'm in love!
Cooke SP3 lenses


There are 5 different focal lengths, 25, 32, 50, 75 and 100 mm and the 25 to 75mm lenses are all the same size while the 100mm is a little longer, however the pitch gears for focus and iris are in the same place with all the lenses. These are really surprisingly small lenses, looking more like a high quality compact photo lens than a bulky cinematography lens. But don’t let the size and weight fool you, these are beautiful lenses.

Screenshot-2023-09-05-at-17.08.47 Cooke SP3 compact lenses - I'm in love!


They have both metric and imperial scales and if you buy all 5 they come in a nice compact flight case. In fact, when I got to use them the first thing to really surprise me was how small and light the case was for a set of 5 prime lenses.

SA-Shoot-origami1_2.2.1-copy-scaled Cooke SP3 compact lenses - I'm in love!
Shot with a Cooke SP3


SA-Shoot-paper-room1_2.1.1-copy-scaled Cooke SP3 compact lenses - I'm in love!
Shot with a Cooke SP3, DP Mostafa Fahmy.


So, I guess the big question is – what do they look like? All I can say is beautiful. When using these lenses there is no doubt that you are using a Cooke lens. They just have that classic slightly warm, crisp but not razor sharp look. They don’t flare excessively, but when they do it looks very nice. They are designed to be sharpest along the lenses focal axis, this means the center of the image is very crisp and then there is a very slight sharpness fall off towards the edges of the frame. This helps draw the viewers eye into the image in a very natural way. 


The bokeh from these lenses is very nice indeed with no onion skin, no odd swirls, just nice round bokeh balls in the center of the frame that become more oval towards the edges and corners. It’s a very pleasing look – I really wish that I could have used these lenses for my circus shoot at Glastonbury this year, they would have been perfect!

SA-Shoot-red-string_2.1.2-scaled Cooke SP3 compact lenses - I'm in love!
Shot with an E-Mount Cooke SP3


On my FX3 it was like having a normal photo sized lens on the camera, except the images looked smoother and had a quality to them rarely seen with a photo lens. On the FX6 they were an absolute delight to use. If I had to choose between a Sony Venice with a typical photo lens or my FX6 with an SP3, for image quality I would in in almost every case prefer the FX6 with an SP3.

SA-Shoot-Projector1_1.2.3-scaled Cooke SP3 compact lenses - I'm in love!
Shot with an E-Mount Cooke SP3


Handing the demo samples back was tough. Each lens costs around £3,250.00 GBP.  They are proper Cooke lenses, so they were never going to be budget, low cost lenses, there are already plenty of those to choose from. But what they are is a more affordable Cooke option, an entry point into the genuine Cooke look. You can buy the full set or one lens at a time, the full set is £15,400.00 GBP. I think that due to the classic, timeless look of the images these lenses produce they are unlikely to date. So if you can’t afford a full set all in one go perhaps an option will be to slowly build a set over a number of years rather than buying all 5 in one hit. 

I can’t wait to use these lenses again. They are the perfect match for Sony’s E-Mount cameras. They are not heavy, not bulky. Don’t need any mounting adapters. And the images they produce are to die for.

All frame grabs shot using Cooke SP3 lenses, these are from a project  where I was DiT and technical advisor, the DP was Mostafa Fahmy.

Sirui Night Walker APS-C/Super35 mm t1.2 Lens review.

Shortly before my annual trip to film the Theatre and Circus fields of the Glastonbury festival I was offered the use of a set of pre-production Sirui  Night Walker lenses. Currently one of my favourite cameras to shoot with is my FX30, so the opportunity to use a set of fast, mini prime lenses, purpose made for APS-C/Super 35 was an offer to good to refuse.

IMG_0481-Large Sirui Night Walker APS-C/Super35 mm t1.2 Lens review.
Sirui Night Walker 55mm t1.2 lens on my FX30


The Night Walkers are small lenses, only 84mm long. But the have a very nice weight and feel to them. They are constructed out of aluminium and feel solid and robust. They have good quality gear rings for a remote follow focus and a pretty decent 270 degree focus throw (although the scale does get a little cramped from 9m to infinity). The drag of the focus ring and iris rings gives a nice feel and for me seems just right. Holding them in your hand they certainly feel like a quality lens. They all have the same front diameter and all take a 67mm filter. 

Currently there are 3 focal lengths, a 24mm, 35mm and a 55mm. It would be nice to have a wider lens in the set at some point but this is a pretty good place to start. 

IMG_0485-Large Sirui Night Walker APS-C/Super35 mm t1.2 Lens review.

I didn’t do any scientific testing, instead I just dived straight in to the shoot. I started by shooting some of the preparations that go on inside the circus big top. We were supplying footage for the BBC to use in a special feature about the circus at Glastonbury and they were very keen to get some behind the scenes footage. During the build it is often very dark inside the big top tent as there is very little external light. So, having very fast lenses was a big help.

I have to admit that I have been shooting a lot with autofocus recently and it took me a little while to get back into the swing of shooting gun with a manual lens. But it really was worth the extra effort and there is something nice about  that very positive connection you get between yourself and the camera when a good quality manual focus cine lens that you just don’t get with most lenses designed primarily for autofocus.

These really are mini cine lenses, designed for video, designed for manual focus.

So, the BIG question – how do they look?

Well, the images they produce looks really nice. At t1.2 they are a touch soft, but not in a nasty way, I think this slight softness actually helps to take the edge off the extreme sharpness of a 4K camera like the FX30. As you stop them down a bit they do get sharper and from around t3.5 they are very sharp. But overall on my FX30 I liked they way they looked wide open. It’s very cliché but I guess I would describe it as a vintage look. I did a lot of pull focusses with them and the breathing is extremely well controlled and barely noticeable across all 3 lenses in the set. 

Flare is also well controlled, although if you really push them shooting directly into the sun or another extremely bright light shadows may become very slightly elevated, but certainly not anything to worry about. Chromatic aberrations are also well minimised. As you would expect there is a bit more when wide open, but stop down a bit and there is barely any CA. 

The bokeh from these lenses is very pleasing. I didn’t notice anything nasty or unpleasant in the out of focus areas, something that often spoils many other budget lenses. The bokeh is smooth and uniform.

Take a look at this video shot entirely with the Night Walkers to get an idea of how they look.

I have to say that shooting with these lenses was a delight. A few years ago I shot in the big top with a Venice and Cooke Anamorphics. Since then I have wanted to get a similar look but without the bulk (or cost). The Night Walkers went a long way towards getting that look.

The best bit about these lenses however is the price.  At the moment  Sirui are offering a very special price of only $309.00 per lens via their Indigogo campaign. After that they will be $349.00. Even at that higher price these lenses are an absolute bargain if you have a camera with an APS-C sensor camera such as the FX30 or a camera with a super 35mm scan mode.

Optical Filtration – Formatt Hitech Soft Gold.

In this modern age where almost any look can be created in post I find that there is still something extremely satisfying about creating as much of the final look of your content in camera as possible. And one thing that can make a huge difference is optical filtration.
As camera resolution continues to increase one type of filter that I find particularly useful is the diffusion filter. Diffusion filters can help take the digital edge off an electronic camera. They do this by causing some of the light passing through the filter to scatter which has a softening and contrast reducing effect, especially around highlights. 
By using different materials to scatter the light the effect can be coloured or modified for different looks.  A little bit of diffusion can really help to tame difficult highlights.

For a recent workshop where we had a scene that was designed to give the feel of an old Edwardian study,  I decided I wanted to create a very  romantic look. So I after playing with a couple of different diffusion filters I settled on a Formatt Hitech 1/4 Soft Gold filter. This filter is really nice for this type of shot as it adds a warm golden glow to high contrast areas. It also makes skin tones look a  little richer.

If you compare the first image which was shot without the filter and the other images that were shot with the filter, while I am happy with the shot without the filter, I really do feel that the filter transforms the shot into something that looks more romantic and has an “older” feel to it. Perhaps the 1/8th version of the filter might have been a better choice for a less strong effect, but this really is a filter I like a lot.

2-Shot-no-filter_1.6.1-scaled Optical Filtration - Formatt Hitech Soft Gold.
The scene without any additional filtration (click on the image to enlarge it).
Medium-shot1_1.3.2-scaled Optical Filtration - Formatt Hitech Soft Gold.
A shot from the scene with the Formatt Hitech 1/4 soft gold filter (click on the image to enlarge it).
Male-Face1_1.4.2-scaled Optical Filtration - Formatt Hitech Soft Gold.
Another shot from the scene with the Formatt Hitech 1/4 soft gold filter (click on the image to enlarge it).

The extra glow around the candles really enhances the sense of the candles being a part of the lighting while the softening of the highlights on the actors faces helps to make the images look more organic and less digital.

Candles-only1_1.10.1-scaled Optical Filtration - Formatt Hitech Soft Gold.
In this shot the only light was from the candles and the 1/4 Soft Gold filter makes the scene feel very warm and cosy.

A Review of the Tokina Vista Prime Lenses

I was recently given the opportunity shoot some test footage with a Sony Venice II.  A camera like Venice needs good glass, so I put out some feelers to see what lenses I could get for the shoot. I was offered the use of a set of the Tokina Vista primes, lenses I have been wanting to try for some time, so this was the perfect opportunity to try these interesting lenses on Sony’s newest cinema camera.

DSC_0298-600x450 A Review of the Tokina Vista Prime Lenses
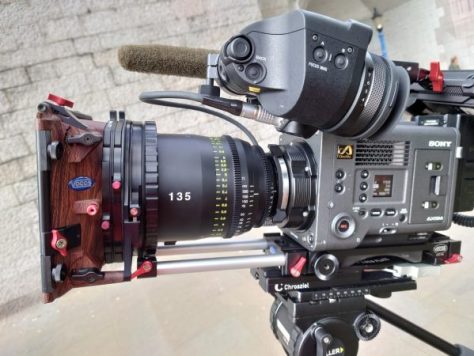
Shooting at Tower Bridge London with the Tokina Vista 135mm and Venice 2


Lets cut straight to the point: I love these lenses and I loved using them with the Venice 2.

I guess I had some concerns at first over choosing the Tokina Vista’s. Lets face it, Tokina are not the first brand that springs into most peoples minds when you are thinking about high quality PL cinema lenses. But I had been hearing nothing other than good things about them and when I had played with them at a couple of different trade shows, they did always look nice.

There are currently 8 lenses in the Vista range starting at the very wide 18mm and going up to 135mm. All are t1.5, are beautifully constructed with all metal bodies. The focus and aperture rings (with approx 300 degrees of travel) are in the same position on every lens in the set, so lens swaps are easy. The 9 bladed iris works well to give pleasing smooth bokeh.

DSC_0299-600x450 A Review of the Tokina Vista Prime Lenses
The Tokina Vista 135mm t1.5 on a Venice 2


Many manufacturers claim that their lenses have minimal breathing and this is definitely true of the Tokina Vista. Focussing from near to far resulted in only a very small change of the image size on all the lenses I tried. The breathing is truly minimal.

As I was shooting using the Venice 2’s 8.2K 17:9 mode this was a good test of the lenses resolution and sharpness. In the video at the bottom of the page you will see a couple of shots where I added a slow post production zoom in to the image, reaching 2x magnification. If you watch the video in 4K you won’t see any appreciable drop in image quality during the zoom in where I am in effect expanding the original 8.2K pixel image by 200%. This to me is a clear indication that these lenses are plenty good enough for 8K capture.

wide-shot-2_1.2.4 A Review of the Tokina Vista Prime Lenses
Wide shot, taken at 8.2K with the 18mm Tokina Vista.
mid-shot-2a_1.2.2 A Review of the Tokina Vista Prime Lenses
A crop from the frame above. Even in 4K this image looks great.


But, at the same time I also felt that the lenses were not excessively sharp. There is a “roundness” to the images from these lenses that I really like. The Vista’s are also very slightly warm looking and this combined with the roundness of the image and very slight propensity to flare a little gives them a very appealing look. I guess I could describe it as a vintage look, but that might make them sound old fashioned. These are not old fashioned lenses, these are clearly modern, high performance lenses. But the images they deliver has a beautiful, almost old school look that I found to be very appealing.

wide-shot-1_1.6.2 A Review of the Tokina Vista Prime Lenses
The Tokina Vistas and Venice 2 deliver great colours and skin tones.
Mid-shot1_1.6.3 A Review of the Tokina Vista Prime Lenses
This is a crop from the above image. When you have 8.2K of pixels and a high resolution lens its very easy to reframe in post production, even when delivering in 4K.


Faces and skin tones looked really nice, of course this is a combination of both a great camera and great lenses, but the colour reproduction from the combination of Venice 2 and the Tokina Vistas was very pleasing.

night-singer_1.30.2 A Review of the Tokina Vista Prime Lenses
At t1.5 the Tokina Vista’s are great for low light and Venice at 3200 ISO looks great.


I did have a play with most of the lenses in the set and they all appeared to perform similarly. But for the video shoot in London I focussed on the 18mm, 40mm and 135mm lenses. 

The 18mm is very wide. It is not truly rectilinear, there is some barrel distortion, but nothing too severe. You do have to remember that this is a t1.5 lens and it’s not easy to produce very fast, very wide lenses for full frame. The 46.7mm image circle of all the Vista lenses means that they comfortably cover the full frame Venice sensor and even at 18mm there is barely any light fall off or vignetting at the edges of the frame.

One of the other things that really impressed me with all the Vista’s was the lack of chromatic aberration. Even when shooting very high contrast, backlit edges or specular reflections it was hard to spot any chromatic aberration. There is not a single shot amongst all of the material that I shot where I noticed anything nasty.

Trafalgar-day_1.27.1 A Review of the Tokina Vista Prime Lenses
Trafalgar Square, shot with the 18mm Vista. You can see that there is some barrel distortion, but it’s pretty good for an 18mm t1.5 lens.


The only negative I can really find about the 18mm is the size and bulk. This is a big and heavy lens. All the Vista have the same external diameter of 114mm. The 18mm is no different in that regard. But the 18mm is one of the longest lenses in the set, it’s 180mm from front to back. And it weighs almost 2.7Kg. A big part of the weight probably comes from the bulbous front element of the lens – which you will be glad to know does not protrude beyond the end of the lens housing, giving it some protection from accidental damage.

When you have an 8K camera, wide angle lenses can be used to capture a very wide frame that can then be cropped into to re-frame in post, so having that maximum t1.5 aperture which helps maintain a shallow DoF is important. 

lanterns1_1.8.2 A Review of the Tokina Vista Prime Lenses
London’s China Town, shot with the 40mm Tokina Vista


The 40mm lens is also really nice. 40mm is an interesting focal length, a shade longer than 35mm and wider than 50mm. I found it to be a very nice focal length for a lot of different types of shots with the Venice Full Frame sensor.  At 2.24kg it is a much lighter lens than the 18mm and a fair bit shorter at 160mm. Once again extremely small amount of breathing and near total lack of chromatic aberrations makes this a lovely lens to shoot with. When shooting high contrast point light sources such as street lights at night there is a bit of circular flare around the light source, but I find this to be quite pleasing. Strong light sources just out of frame can lead to some minor veiling flare on all the lenses in the set, but this is no worse than seen with most other similar quality lenses and the lens coatings give the flare a slight warmth that again, I find very appealing.

tower-bridge_1.3.2 A Review of the Tokina Vista Prime Lenses

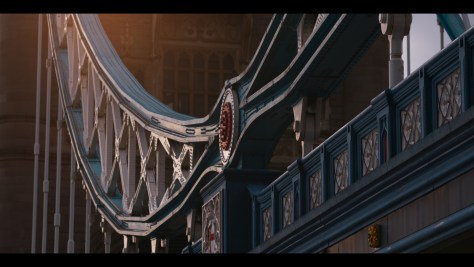
The 135mm lens doesn’t disappoint either, shooting at 135mm and t1.5 delivers a very narrow depth of field.  As expected this is one of the larger lenses in the set. It’s 187mm long so a bit shorter than the 18mm but it is heavier with the PL mount version coming in very close to 3kg. There isn’t much more I can say about this lens that I haven’t covered with the other lenses, extremely minimal breathing, near zero chromatic aberration etc all make for a great image. The consistent look across all the lenses means this too shares that well rounded not too clinical and very slight warmth that makes these all of these lenses very appealing.

night-busses_1.31.1 A Review of the Tokina Vista Prime Lenses
Tokina Vista 40mm on Venice 2 at 3200 ISO. I really like the way the Vistas flare.


The Tokina Vista’s are not re-housed photo lenses, they were designed specifically for digital cinematography. They are available in a range of mounts including PL, Canon EF, MFT, LPL and Sony E. I had heard good things about them from other users before I tried them and now I have had a chance to shoot with them I have to say that they are lenses that I will want to use again. Perhaps in particular when the project would benefit from a slight vintage or romantic look without being soft and without giving up any resolution. For the money they are great looking lenses and would recommend anyone that hasn’t tried them to give them a go.

More Anamorphic Options for the FX9 – Sirui 24mm 1.33x Anamorphic.

Here is what could be a nice option for Anamorphic on the FX9 (or any other Super 35mm capable camera. The new Sirui 24mm 1.33x anamorphic lens. I have not tried these yet, but at only $999 or $749 with the early bird offer it’s certainly an affordable way into the world of Anamorphic. 1.33x lenses are designed to provide a final aspect ratio of 2.40:1 when used with a 16:9 sensor. Here’s the info from the press release.

large-e5f243596bfbebfadb05d80a1c0e418d More Anamorphic Options for the FX9 - Sirui 24mm 1.33x Anamorphic.
large-a0779796aff6c0276f70ae6b5c0c2ecc More Anamorphic Options for the FX9 - Sirui 24mm 1.33x Anamorphic.
large-dc99f9fef16c45ad702d8d811aff5cd7 More Anamorphic Options for the FX9 - Sirui 24mm 1.33x Anamorphic.
The SIRUI 1.33x Anamorphic line-up consists of 24mm, 35mm and 50mm lenses.
  • Focal length: 24mm
  • Maximum aperture: F2.8
  • Minimum aperture: F16
  • Lens structure: 13 elements in 10 groups
  • Aperture blades: 8
  • Maximum support frame: APS-C
  • Shooting distance: 0.6m (2 ft) – infinity
  • Focus method: Manual focusing
  • Maximum magnification: 1:21.99(V),1:29.07 (H)
  • Filter spec: M72 x 0.75
  • Rotation angle of the focus ring: 189.6°
  • Max. diameter: 74mm (2.91 inches)
  • Diameter of focus ring: 64.6mm (2.54 inches)
  • Weight(g/lbs): MFT Mount: 770/1.70; E Mount: 780/1.72; X Mount: 780/1.72; EF-M Mount: 780/1.72; Z Mount: 810/1.79
  • Total length (lens cap not included) (mm/inch): MFT Mount: 124.9/4,92; E Mount: 126.1/4.96; X Mount: 126.4/4.98; EF-M Mount: 126.1/4.96; Z Mount: 128.1/5.04
preview-eb0cf788bc1720d61f3bb2319c6421ab More Anamorphic Options for the FX9 - Sirui 24mm 1.33x Anamorphic.

Guess The Lens! A little bit of fun and an interesting test.

Last week I was at O-Video in Bucharest preparing for a workshop the following day. They are a full service dealer. We had an FX9 for the workshop and they had some very nice lenses. So with their help I decided to do a very quick comparison of the lenses we had. I was actually very surprised by the results. At the end of the day I definitely had a favourite lens. But I’m not going to tell you which one yet.

The 5 lenses we tested were: Rokinon Xeen, Cooke Panchro 50mm, Leitz (lecia) Thalia, Zeiss Supreme Radiance and the Sony 28-135mm zoom that can be purchased as part of a kit with the FX9.

I included a strong backlight in the shot to see how the different lenses dealt with flare from off-axis lights. 2 of the lenses produced very pronounced flare, so for those lenses you will see two frame grabs. One with the flare and one with the back light flagged off.

I used S-Cinetone on the FX9 and set the aperture to f2.8 for all of the lenses except the Sony 28-135mm. For that lens I added 6dB of gain to normalise the exposure, you should be able to figure out which of the examples is the Sony zoom.

One of the lenses was an odd focal length compared to all the others. Some of you might be able to work out which one that is, but again I’m not going to tell you just yet.

Anyway, enjoy playing guess the lens. This isn’t intended to be an in depth test. But it’s interesting to compare lenses when you have access to them.  I’ll reveal which lens is which in a couple of weeks in the comments. You can click on each image to enlarge it.

Big thanks to everyone at O-Video Bucharest for making this happen.

Lens1-flare Guess The Lens! A little bit of fun and an interesting test.
Lens 1 with flare from backlight.
lens1-no-flare Guess The Lens! A little bit of fun and an interesting test.
Lens 1 with backlight flagged to reduce the flare.
lens2 Guess The Lens! A little bit of fun and an interesting test.
Lens 2
lens-3 Guess The Lens! A little bit of fun and an interesting test.
Lens 3
lens-4-no-flare Guess The Lens! A little bit of fun and an interesting test.
Lens 4
lens-5-flare Guess The Lens! A little bit of fun and an interesting test.
Lens 5 with flare from backlight
lens-5-No-flare Guess The Lens! A little bit of fun and an interesting test.
Lens 5 with backlight masked to kill the flare.

Which Lenses work well with the FX9’s Autofocus?

Below is a list of lenses that have been tested with the FX9’s advanced autofocus system. Generally any Sony E-mount lens will work just fine. The Sony G series lenses are good and the G Master series tend to be even better. 
For third party lenses and adapters the situation is much less clear, so I have decided to list the lenses I have tested and invite others to contribute to this list via the comments area. The list is not exhaustive at this time but I will try to keep adding to it as I am able to try more lenses and and different adapter combinations.

Inclusion of a lens on this list is not a guarantee that it will or will not work, it is simply an indication of how it worked for me or anyone else that adds information about their own experiences. I welcome updates and any further information from any lens or adapter manufacturer.

If there is a lens you have tested on an FX9 please let me know via the comments how it worked so it can be added to the list.

KNOWN TO WORK WELL:

Sony E (super 35mm) FE (full frame) lenses, G and G-Master including Zeiss ZA series. G and G Master  tend to have the best AF performance.

Tamron 28-75 f2.8 Di III RXD E-mount.

KNOWN TO WORK, BUT NOT AS GOOD AS ORIGINAL SONY:

Sigma 20mm f1.4 ART with Sigma MC11 adapter. Works, but a little slow and occasionally hunts.

KNOWN TO NOT PERFORM WELL:

Sigma 20mm f1.4 ART native E-mount (very slow AF, hunting, contrast only?).

Sigma 85mm f1.4 ART native E-mount (very slow AF, a lot of hunting).

Sigma 20mm f1.4 ART Canon EF mount on metabones, comlite or viltrox adapters. Very slow AF, not really useable.

NO GOOD, NO AF:

Tamron EF 16-300mm

Sigma EF 18-250mm


The “E” in “E-Mount” stands for Eighteen.

A completely useless bit of trivia for you is that the “E” in E-mount stands for eighteen. 18mm is the E-mount flange back distance. That’s the distance between the sensor and the face of the lens mount. The fact the e-mount is only 18mm while most other DSLR systems have a flange back distance of around 40mm means thare are 20mm or more in hand that can be used for adapters to go between the camera body and 3rd party lenses with different mounts.

Here’s a little table of some common flange back distances:

MOUNT FLANGE BACK SPARE/Difference
e-mount 18mm
Sony FZ (F3/F5/F55) 19mm 1mm
Canon EF 44mm 26mm
Nikon F Mount 46.5mm 28.5mm
PL 52mm 34mm
Arri LPL 44mm 26mm
Sony A, Minolta 44.5mm 26.5mm
M42 45.46mm 27.46mm

Thinking about new lenses for the FX9?

DSC_0421-2-1024x576 Thinking about new lenses for the FX9?
Sony 28-135mm f4 zoom on the PXW-FX9

If you are starting to think about lenses to take advantage of the FX9’s amazing autofocus capabilities then you should know that I have tested quite a few different lenses on the FX9 now. I have yet to find a Sony lens where the AF hasn’t worked really well. Even the low cost Sony 50mm f1.8 and 28mm f2 lenses worked very well. Infact I actually quite like both of these lenses and they represent great value for the money.

But what I have found is that non Sony lenses have not worked well. I have been testing a range of lenses on various pre-production cameras. Maybe this situation will improve through firmware updates, I would hope so, but I honestly don’t know. The E-mount Sigma 18-35 and 20mm art lenses I tried were not at all satisfactory. The AF worked, but in what appears to be a contrast only mode. The autofocus was much slower and hunted compared to the fast, hunt free AF with the Sony lenses. You would not want to use this which is a great shame as these lenses are optically very nice.

It’s the same story when using Canon EF lenses via both Metabones and Viltrox adapters (I have not tested the Sigma MC11). Phase AF does not appear to work, only contrast and it’s slow.

So if you are thinking about buying lenses for the FX9 the only lenses I can recommend right now are Sony lenses. Don’t (at this stage at least) buy other brand E-mount lenses or expect lenses to be used via adapters unless you can find a way to test them on an FX9 first.

Shooting Anamorphic with the Fujinon MK’s and SLR Magic 65 Anamorphot.

There is something very special about the way anamorphic images look, something that’s not easy to replicate in post production. Sure you can shoot in 16:9 or 17:9 and crop down to the typical 2.35:1 aspect ratio and sure you can add some extra anamorphic style flares in post. But what is much more difficult to replicate is all the other distortions and the oval bokeh that are typical of an anamorphic lens.

Anamorphic lenses work by distorting the captured image. Squeezing or compressing it horizontally, stretching it vertically. The amount of squeeze that you will want to use will depend on the aspect ratio of the sensor or film frame. With full frame 35mm cameras or cameras with a 4:3 aspect ratio sensor or gate you would normally use an anamorphic lens that squeezes the image by 2 times. Most anamorphic cinema lenses are 2x anamorphic, that is the image is squeezed 2x horizontally. You can use these on cameras with a 16:9 or 17:9 super35mm sensor, but because a Super35 sensor already has a wide aspect ratio a 2x squeeze is much more than you need for that typical cinema style final aspect ratios of 2.39:1.

For most Super35mm cameras it is normally better to use a lens with a 1.33x squeeze. 1.33x squeeze on Super35 results in a final aspect ratio close to the classic cinema aspect ratio of 2.39:1.

Traditionally anamorphic lenses have been very expensive. The complex shape of the anamorphic lens elements are much harder to make than a normal spherical lens. However another option is to use an anamorphic adapter on the front of an existing lens to turn it into an anamorphic lens. SLR Magic who specialise in niche lenses and adapters have had a 50mm diameter 1.33x anamorphic adapter available for some time. I’ve used this with the FS7 and other cameras in the past, but the 50mm diameter of the adapter limits the range of lenses it can be used with (There is also a 50mm 2x anamorphot for full frame 4:3 aspect ratio sensors from SLR Magic).

Now SLR Magic have a new larger 65mm adapter. The 1.33-65 Anamorphot has a much larger lens element, so it can be used with a much wider range of lenses. In addition it has a calibrated focus scale on it’s focus ring. One thing to be aware of with adapters like these is that you have to focus both the adapter and the lens you are using it on. For simple shoots this isn’t too much of a problem. But if you are moving the camera a lot or the subject is moving around a lot, trying to focus both lenses together can be a challenge.

DSC_0103 Shooting Anamorphic with the Fujinon MK's and SLR Magic 65 Anamorphot.
The SLR Magic 1.33-65 Anamorphot anamorphic adapter.

Enter the PD Movie Dual Channel follow focus.

The PD Movie Dual follow focus is a motorised follow focus system that can control 2 focus motors at the same time. You can get both wired and wireless versions depending on your needs and budget. For the anamorphic shoot I had the wired version (I do personally own a single channel PD Movie wireless follow focus). Setup is quick and easy, you simply attach the motors to your rods, position the gears so they engage with the gear rings on the lens and the anamorphot and press a button to calibrate each motor. It takes just a few moments and then you are ready to go. Now when you turn the PD Movie focus control wheel both the taking lens and the anamorphot focus together.

I used the anamorphot on both the Fujinon MK18-55mm and the MK50-135mm. It works well with both lenses but you can’t use focal lengths wider than around 35mm without the adapter some causing vignetting. So on the 18-55 you can only really use around 35 to 55mm. I would note that the adapter does act a little like a wide angle converter, so even at 35mm the field of view is pretty wide. I certainly didn’t feel that I was only ever shooting at long focal lenghts.

DSC_0099 Shooting Anamorphic with the Fujinon MK's and SLR Magic 65 Anamorphot.
The full rig. PMW-F5 with R5 raw recorder. Fujinon MK 18-55 lens, SLR Magic Anamorphot and PD Movie dual focus system.

Like a lot of lens adapters there are some things to consider. You are putting a lot of extra glass in front of you main lens, so it will need some support. SLR magic do a nice support bracket for 15mm rods and this is actually essential as it stops the adapter from rotating and keeps it correctly oriented so that your anamorphic squeeze remains horizontal at all times. Also if you try to use too large an aperture the adapter will soften the image. I found that it worked best between f8 and f11, but it was possible to shoot at f5.6. If you go wider than this, away from the very center of the frame you get quite a lot of softening image softening. This might work for some projects where you really want to draw the viewer to the center of the frame or if you want a very stylised look, but it didn’t suit this particular project.

The out of focus bokeh has a distinct anamorphic shape, look and feel. As you pull focus the shape of the bokeh changes horizontally, this is one of the key things that makes anamorphic content look different to spherical. As the adapter only squeezes by 1.33 this is as pronounced as it would be if you shot with a 2x anamorphic. Of course the other thing most people notice about anamorphic images is lens flares that streak horizontally across the image. Intense light sources just off frame would produce blue/purple streaks across the image. If you introduce very small point light sources into the shot you will get a similar horizontal flare. If flares are your thing it works best if you have a very dark background. Overall the lens didn’t flare excessively, so my shots are not full of flares like a JJ Abrams movie. But when it did flare the effect is very pleasing. Watch the video linked above and judge for yourself.

Monitoring and De-Squeeze.

When you shoot anamorphic you normally record the horizontally squashed image and then in post production you de-squeeze the image by compressing it vertically. Squashing the image vertically results in a letterbox, wide screen style image and it’s called “De-Squeeze”. You can shoot anamorphic without de-sqeezing the image provided you don’t mind looking at images that are horizontally squashed in your viewfinder or on your monitor. But these days you have plenty of monitors and viewfinders that can “de-squeeze” the anamorphic image so that you can view it with the correct aspect ratio. The Glass Hub film was shot using a Sony PMW-F5 recording to the R5 raw recorder. The PMW-F5 has the ability to de-squeeze the image for the viewfinder built in. But I also used an Atomos Shogun Inferno to monitor as I was going to be producing HDR versions of the film. The Shogun Inferno has both 2x and 1.33x de-squeeze built in so I was able to take the distorted S-Log3 output from the camera and convert it to a HDR PQ image and de-squeeze it all at the same time in the Inferno. This made monitoring really easy and effective.

I used DaVinci Resolve for the post production. In the past I might have done my editing in Adobe Premiere and the grading in Resolve. But Resolve is now a very capable edit package, so I completed the project entirely in Resolve. I used the ACES colour managed workflow as ACES means I don’t need to worry about LUT’s and in addition ACES adds a really nice film like highlight roll off to the output. If you have never tried a colour managed workflow for log or raw material you really should!

The SLR Magic 65-1.33 paired with the Fujinon MK lenses provides a relatively low cost entry into the world of anamorphic shooting. You can shoot anywhere from around 30-35mm to 135mm. The PD Movie dual motor focus system means that there is no need to try to use both hands to focus both the anamorphot and the lens together. The anamorphot + lens behave much more like a quality dedicated anamorphic zoom lens, but at a fraction of the cost. While I wouldn’t use it to shoot everything the Anamorphot is a really useful tool for those times you want something different.